
AuthZed is a platform focused exclusively on authorization. In contrast to authentication, which verifies a user's identity, authorization decides a user's access rights for resources once their identity is known. AuthZed centralizes, unifies, and scales this core security layer so developers don’t have to implement their own permission logic in every application.
SpiceDB is the core engine behind all AuthZed products. It is designed to be entirely agnostic to authentication solutions and identity providers. SpiceDB is a graph engine that centrally stores authorization data (relationships and permissions). Authorization requests (for example, checkPermission, lookupResources) are resolved via a dispatcher that traverses the permission graph.

SpiceDB is available in multiple forms depending on deployment and support needs:
- SpiceDB (Open Source): The foundational, community-driven version of the authorization engine, free to use and self-hosted under the Apache 2.0 license.
- SpiceDB Enterprise: A self-managed enterprise edition that includes audit logging, fine-grained API control, FIPS-validated cryptography, and dedicated support.
- AuthZed Dedicated: A fully managed, single-tenant SaaS offering that provides all enterprise features along with global, regionally distributed deployments and integrated APIs for permission filtering.
- AuthZed Cloud: A multi-tenant managed platform designed for teams that want to start quickly without operational overhead.
Across all these tiers, CockroachDB provides resiliency and scalability as SpiceDB's underlying datastore.
Set up a joint CockroachDB/AuthZed environment
Imagine that you’re building a global content management application that uses SpiceDB, as the access control system backed by CockroachDB across multiple regions. This tutorial walks you through the manual setup of a joint CockroachDB/AuthZed environment.
Before you begin
To complete this tutorial, you will need:
- A local copy of a supported CockroachDB binary.
- Network access from your SpiceDB runtime to port
26257.
Step 1. Provision a CockroachDB cluster
First you need to provision the CockroachDB cluster that AuthZed will use for its services. Choose one of the following methods to create a new CockroachDB cluster, or use an existing cluster and skip to Step 2.
Be sure to create a secure cluster. This is necessary for the user creation step of this tutorial.
Create a secure cluster locally
If you have the CockroachDB binary installed locally, you can manually deploy a multi-node, self-hosted CockroachDB cluster on your local machine.
Learn how to deploy a CockroachDB cluster locally.
Create a CockroachDB Self-Hosted cluster on AWS
You can manually deploy a multi-node, self-hosted CockroachDB cluster on Amazon's AWS EC2 platform, using AWS's managed load-balancing service to distribute client traffic.
Learn how to deploy a CockroachDB cluster on AWS.
Create a CockroachDB Cloud cluster
CockroachDB Cloud is a fully-managed service run by Cockroach Labs, which simplifies the deployment and management of CockroachDB.
Sign up for a CockroachDB Cloud account and create a cluster using trial credits.
Step 2. Create a database for AuthZed
Before integrating AuthZed with CockroachDB, you will need to set up a dedicated database.
Replace
{certs-dir}with the certificates directory that you established during the cluster setup, and{crdb-fqdn}with your CockroachDB load balancer domain name. Then run the following command:cockroach sql --certs-dir={certs-dir} --host={crdb-fqdn}:26257Once connected to the SQL shell, create the following database:
CREATE DATABASE spicedb;Create a user
authzand grant them privileges for thespicedbdatabase:CREATE USER authz WITH PASSWORD 'securepass'; GRANT ALL ON DATABASE spicedb TO authz;
Step 3. Install and configure SpiceDB
Install the SpiceDB binary for your given system (supported systems include macOS, Docker, Kubernetes, Ubuntu/Debian, RHEL/CentOS, and Windows).
Define your CockroachDB cluster as the datastore for SpiceDB. Replace the
{crdb-uri}placeholder with your cluster URI, and replace the{client-authz-cert},{client-authz-key}, and{ca-cert}placeholders with paths to the relevant certificate files in your certs directory:spicedb datastore migrate head \ --datastore-engine=cockroachdb \ --datastore-conn-uri="postgres://authz:securepass@{crdb-uri}:26257/spicedb?sslmode=verify-full&sslcert={client-authz-cert}&sslkey={client-authz-key}&sslrootcert={ca-cert}"Start the SpiceDB service pointing at your CockroachDB URI. Replace the same placeholders as those in the preceding command. In addition, define a
{preshared-key}, to be used in further commands:spicedb serve \ --grpc-preshared-key="{preshared-key}" \ --http-enabled=true \ --datastore-engine=cockroachdb \ --datastore-conn-uri="postgres://authz:securepass@{crdb-uri}:26257/spicedb?sslmode=verify-full&sslcert={client-authz-cert}&sslkey={client-authz-key}&sslrootcert={ca-cert}"
Step 4. Install the AuthZed CLI
To interact with SpiceDB through the zed (AuthZed) CLI, install the latest binary releases of zed.
Once installed, connect to the SpiceDB instance exposed in the client with the following command. For local development, you can use the
--insecureflag to connect over plaintext. Be sure to use the same{preshared-key}that you used in the preceding step. Replace the{spicedb-ip}placeholder with the IP of your SpiceDB instance:zed context set my_context {spicedb-ip}:50051 {preshared-key} --insecureCheck that the command worked by running:
zed versionIf the output indicates that the server version is
unknown, then your CLI was unable to connect. You may need to verify the values in previous steps, such as the{preshared-key}, the IP or the port that your SpiceDB instance is running on.When successfully executed,
zed versionshould output something similar to the following:client: zed v0.31.1 service: v1.45.4
You can interact with SpiceDB using the AuthZed CLI, with the HTTP API or with the gRPC API. The remaining instructions will demonstrate how to use both the AuthZed CLI and the HTTP API to complete the integration.
Step 5. Define the authorization schema
The first step in developing an authorization relationship schema is defining one or more object types. For example, you could define the following object relationships:
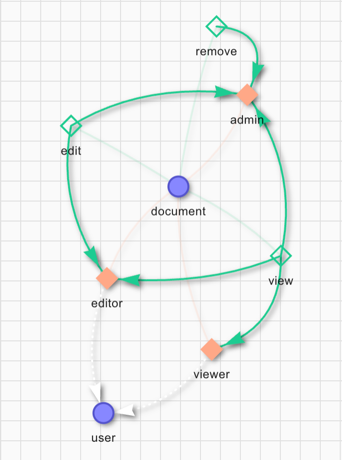
The main two items in this example are the user and document objects. The user can be a viewer, an editor or an admin. The definition gives the remove permission to the admin role only. To edit a file the user must be either an editor or an admin. The permission to view a document is set for the viewer, editor and admin roles.
Use the AuthZed CLI
Define the schema by writing the following file:
definition user {}

definition document {
    relation editor: user
    relation viewer: user
    relation admin: user

    permission view = viewer + editor + admin
    permission edit = editor + admin
    permission remove = admin
}
Save this file as
schema.zed.Apply the schema to SpiceDB, pointing to the saved
schema.zedfile.zed schema write ./schema.zedTo verify that this has worked, run the following command, which should print the applied schema:
zed schema read
Use the HTTP API
Embed the schema definition within a WriteSchemaRequest body, making sure to replace the {spicedb-ip} placeholder with the IP of your SpiceDB instance, and the {preshared-key} placeholder with value defined in Step 3:
curl --location 'http://{spicedb-ip}:8443/v1/schema/write' \
--header 'Content-Type: application/json' \
--header 'Accept: application/json' \
--header 'Authorization: Bearer {preshared-key}' \
--data '{
"schema": "definition user {} \n definition document { \n relation editor: user \n relation viewer: user \n relation admin: user \n permission view = viewer + editor + admin \n permission edit = editor + admin \n permission remove = admin \n}"
}'
If successful, that request will return a response which includes a token:
{"writtenAt":{"token":"GhUKEzE3NTgxMjkyOTM0MDE2MDYxNDA="}}
Step 6. Define authorization relationships
In SpiceDB, relationships are represented as tuples. Each tuple contains a resource, a relation and a subject. In this example, the resource is the name of a document, the relation is either admin, viewer or editor, and the subject is the name of a user.
In this scenario, make user alice an admin for doc1. This means that she can view, edit, and remove the document. Then make user bob a viewer for doc1. This means he can view the document.
Use the AuthZed CLI
Define a new relationship for a document called doc1. Use the following command to make alice an admin for doc1:
zed relationship touch document:doc1 admin user:alice
Define a new relationship for doc1. Use the following command to make bob a viewer for doc1:
zed relationship touch document:doc1 viewer user:bob
Use the HTTP API
Define the relationships in a WriteRelationshipsRequest body, making sure to replace the {spicedb-ip} placeholder with the IP of your SpiceDB instance, and the {preshared-key} placeholder with value defined in Step 3:
curl --location 'http://{spicedb-ip}:8443/v1/relationships/write' \
--header 'Content-Type: application/json' \
--header 'Accept: application/json' \
--header 'Authorization: Bearer {preshared-key}' \
--data '{
    "updates": [
        {
            "operation": "OPERATION_TOUCH",
            "relationship": {
                "resource": {
                    "objectType": "document",
                    "objectId": "doc1"
                },
                "relation": "admin",
                "subject": {
                    "object": {
                        "objectType": "user",
                        "objectId": "alice"
                    }
                }
            }
        },
        {
            "operation": "OPERATION_TOUCH",
            "relationship": {
                "resource": {
                    "objectType": "document",
                    "objectId": "doc1"
                },
                "relation": "viewer",
                "subject": {
                    "object": {
                        "objectType": "user",
                        "objectId": "bob"
                    }
                }
            }
        }
    ]
}'
If successful, that request will return a response which includes a token:
{"writtenAt":{"token":"GhUKEzE3NTgxMjk3MDg2NTc4MDQ5ODk="}}
Test the CockroachDB/AuthZed Integration
Once both CockroachDB and AuthZed are provisioned and configured, and the authorization relationships have been defined in SpiceDB, validate that the relationships are accessible in the CockroachDB data store.
Check user permissions
Verify that AuthZed has captured the authorization data that you have defined.
Use the AuthZed CLI
To check that our schema is working correctly, issue check requests. As bob is only a viewer for doc1, you can expect him to have the view permission but not the edit or remove permissions:
zed permission check document:doc1 view user:bob
# true
zed permission check document:doc1 edit user:bob
# false
Because alice is an admin, she has all permissions:
zed permission check document:doc1 view user:alice
# true
zed permission check document:doc1 remove user:alice
# true
zed permission check document:doc1 edit user:alice
# true
Use the HTTP API
Define the permission that you want to check within a CheckPermissionRequest body. This check includes a user, a resource, and an action. Make sure to replace the {spicedb-ip} placeholder with the IP of your SpiceDB instance, and the {preshared-key} placeholder with value defined in Step 3:
curl --location 'http://{spicedb-ip}:8443/v1/permissions/check' \
--header 'Content-Type: application/json' \
--header 'Accept: application/json' \
--header 'Authorization: Bearer {preshared-key}' \
--data '{
  "consistency": {
    "minimizeLatency": true
  },
  "resource": {
    "objectType": "document",
    "objectId": "doc1"
  },
  "permission": "view",
  "subject": {
    "object": {
      "objectType": "user",
      "objectId": "bob"
    }
  }
}'
If successful, that request will return a response which includes a token. That token will include a permissionship item, that explains whether the given user has permission to perform the given action on the given resource:
{"checkedAt":{"token":"GhUKEzE3NTgxMjk5NTAwMDAwMDAwMDA="}, "permissionship":"PERMISSIONSHIP_NO_PERMISSION"}
Send another CheckPermissionRequest for each permission that you want to check.
Access AuthZed data with CockroachDB SQL
To demonstrate that CockroachDB is being used as the data store for this SpiceDB instance, access the same authorization data using CockroachDB SQL.
Go to your CockroachDB SQL client.
Run the following query to verify the accessibilty of the AuthZed schema in CockroachDB:
SELECT namespace, serialized_config FROM public.namespace_config;The result set contains data about the permission:
-[ RECORD 1 ]
namespace         | document
serialized_config | \x0a08646f63756d656e7412610a06656469746f721a130a110a04757365722a04080310151a032e2e2e22340a320a2c747970652e676f6f676c65617069732e636f6d2f696d706c2e76312e52656c6174696f6e4d65746164617461120208012a04080310043a06656469746f7212610a067669657765721a130a110a04757365722a04080410151a032e2e2e22340a320a2c747970652e676f6f676c65617069732e636f6d2f696d706c2e76312e52656c6174696f6e4d65746164617461120208012a04080410043a06766965776572125f0a0561646d696e1a130a110a04757365722a04080510141a032e2e2e22340a320a2c747970652e676f6f676c65617069732e636f6d2f696d706c2e76312e52656c6174696f6e4d65746164617461120208012a04080510043a0561646d696e1294010a0476696577123d2204080710160a350a102a0408071016120812067669657765720a102a040807101f12081206656469746f720a0f2a04080710281207120561646d696e22340a320a2c747970652e676f6f676c65617069732e636f6d2f696d706c2e76312e52656c6174696f6e4d65746164617461120208022a04080710043a1125363135613339316264643736396537311282010a0465646974122b2204080810160a230a102a040808101612081206656469746f720a0f2a040808101f1207120561646d696e22340a320a2c747970652e676f6f676c65617069732e636f6d2f696d706c2e76312e52656c6174696f6e4d65746164617461120208022a04080810043a11253164396466303630383264376535353212790a0672656d6f766512192204080910180a110a0f2a04080910181207120561646d696e22340a320a2c747970652e676f6f676c65617069732e636f6d2f696d706c2e76312e52656c6174696f6e4d65746164617461120208022a0408091004320561646d696e3a11253964363065336431613866616231663722020802
-[ RECORD 2 ]
namespace         | user
serialized_config | \x0a04757365722200

Time: 4ms total (execution 4ms / network 0ms)
Run the following query to verify the accessibilty of AuthZed access control data using CockroachDB:
SELECT namespace, object_id, relation, userset_namespace, userset_object_id, timestamp, expires_at FROM public.relation_tuple;The result set contains permissions data. Much of this data, including
object_id,relation, anduserset_object_id, should match that provided in the relation tuple in Step 6 of the setup instructions:namespace | object_id | relation | userset_namespace | userset_object_id | timestamp | expires_at ------------+-----------+----------+-------------------+-------------------+----------------------------+------------- document | doc1 | admin | user | alice | 2026-01-06 18:28:21.12613 | NULL document | doc1 | viewer | user | bob | 2026-01-06 18:28:23.226998 | NULL (2 rows) Time: 4ms total (execution 3ms / network 0ms)
Next steps
These tests confirm that AuthZed is successfully using CockroachDB as its data store. If you get the expected results from these tests, then your integration is ready for use in your application. You can begin building authorization and access control features with CockroachDB and AuthZed.
